meta data for this page
Build and install Yocto for RSC-IMX61
Here you can find instruction to setup development environment for Yocto source code for RSC-IMX61 and the way to install Yocto on system. With this guideline, user will be able to setup the system easily and test all the functions with the system.
Availability
RSC-IMX61 Dual lite
Add RSA key to Avalue GIT Server
Please follow instruction here to add RSA key to Avalue GIT server
Download Source code and cross compiler tool from Avalue git server
#git clone gitlab@aes.avalue.com.tw:BSP-Source-Code/Freescale-Kernel.git -b 3.14.28-1.0.0 \\
#git clone gitlab@aes.avalue.com.tw:RSC-IMX61/RSC-IMX6-KERNEL-PATCH.git -b 3.14.28-1.0.0 \\
#cd Freescale-Kernel \\
#git am ../RSC-IMX6-KERNEL-PATCH/*.patch \\
Setup Build Environment
The recommended minimum Ubuntu version is 14.04 but builds for dizzy will work on 12.04 or later. Earlier versions may cause the Yocto Project build setup to fail, because it requires python versions only available starting wtih Ubuntu 12.04.
Essential Yocto Project host packages:
#sudo apt-get install gawk wget git-core diffstat unzip texinfo gcc-multilib build-essential chrpath socat
i.MX layers host packages for a Ubuntu 12.04 or 14.04 host setup:
#sudo apt-get install libsdl1.2-dev xterm sed cvs subversion coreutils texi2html docbook-utils python-pysqlite2 \
help2man make gcc g++ desktop-file-utils libgl1-mesa-dev libglu1-mesa-dev mercurial autoconf automake groff \
curl lzop asciidoc
i.MX layers host packages for a Ubuntu 12.04 host setup only:
#sudo apt-get install uboot-mkimage
i.MX layers host packages for a Ubuntu 14.04 host setup only:
#sudo apt-get install u-boot-tools
Compile U-Boot & Kernel Source code
After you download source code from Avalue GIT server, you will find a folder named “AIB-IMX6-Kernel”. Here is description for each folder & files inside.
| Item | Description |
|---|---|
| fsl | cross compile tool |
| kernel | folder with kernel source code inside |
| Makefile | Makefile for compile u-boot & kernel image |
| u-boot | folder with u-boot souce code inside |
Use command below to compile u-boot & kernel
#make rsc-imx6 -j4
Use command below to compile u-boot only
#make uboot -j4
Use command below to compile kernel only
#make kernel -j4
Use command below to clean all the binary files in source code
#make clean
After you finish to compile source code, you will find files below in folder “out”. Here are description for each files
| Item | Description |
|---|---|
| u-boot-6q.imx | u-boot for RSC-IMX61 Quad core with 1GB DDR3L memory |
| u-boot-6dl.imx | u-boot for RSC-IMX61 Dual lite with 1GB DDR3L memory |
| u-boot-6solo.imx | u-boot for RSC-IMX61 Solo with 1GB DDR3L memory |
| imx6solo-rsc-imx6.dtb | setting file for RSC-IMX61 Dual lite |
| imx6q-rsc-imx6.dtb | setting file for RSC-IMX61 Quad core |
| zImage | kernel file for RSC-IMX61 |
You will have to copy image files to path \mfgtool\Image\RSC-IMX6\YOCTO of your MfgTool folder.
Bootloader : U-Boot
To modify default setting for u-boot command, you can modify following files in path:
\u-boot\board\freescale\mx6rsc\mx6rsc-imx6.c
\u-boot\include\configs\mx6rsc.h
\u-boot\include\configs\mx6rsc_common.h
Linux Kernel
Please get into folder core/kernel and use command below to load default configuration of kernel and config it
| Command | Description |
|---|---|
| #./run.sh -j4 | Command to build kernel for RSC-IMX61 |
| #./run.sh menuconfig | Command to setup kernel configuration |
| #./run.sh clean | Command to clean binary files in kernel source code |
You can find update zImage in path /kernel/arch/arm/boot
Setting up the repo utility
Repo is a tool built on top of Git that makes it easier to manage projects that contain multiple repositories, which do not need
to be on the same server. Repo complements very well the layered nature of the Yocto Project, making it easier for customers
to add their own layers to the BSP.
To install the “repo” utility, perform these steps:
1. Create a bin folder in the home directory.
#mkdir ~/bin (this step may not be needed if the bin folder already exists)
#curl http://commondatastorage.googleapis.com/git-repo-downloads/repo > ~/bin/repo
#chmod a+x ~/bin/repo
2. Add the following line to the .bashrc file to ensure that the ~/bin folder is in your PATH variable.
export PATH=~/bin:$PATH
Yocto Project Setup
The following steps shows how to download the Freescale Yocto Project Community BSP recipe layers. For this example, a directory called fsl-release-bsp is created for the project.
#mkdir fsl-release-bsp
#cd fsl-release-bsp
#git config --global user.name "Your Name"
#git config --global user.email "Your Email"
#git config --list
#repo init -u git://git.freescale.com/imx/fsl-arm-yocto-bsp.git -b imx-3.14.28-1.0.0_ga
#repo sync
Image Build
This section provides the detailed information along with the process for building an image. Here is instruction to teach you build your own Yocto image.
#cd fsl-release-bsp
#mkdir build //This is your build directory
#source setup-environment build //This is to check all the MACHINE supported
#MACHINE=imx6dlsabresd source fsl-setup-release.sh -b build -e x11 //could be fb, dfb, wayland, x11
#bitbake fsl-image-gui //could be fsl-image-qt5 if you want to build image with qt5 support.
Another easy way is that you can use GUI tool “hob” to do the configuration. Here is the process to run it.
#cd fsl-release-bsp
#source fsl-setup-release.sh -b build
#hob
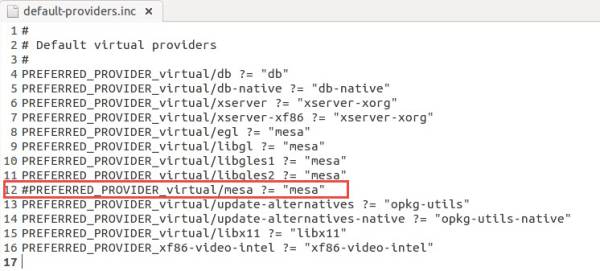
To run “hob”, you may need to modify /fsl-release-bsp/sources/poky/meta/conf/distro/include/default-providers.inc and remove setting below.
Then select machine and image recipe below :
For more detail information. Please check Freescale Yocto Prohect User's Guide.
Restarting a build environment or performing a new build
If a new terminal window is opened or the machine is rebooted after a build directory is set up, the setup environment script
should be used to set up the environment variables and run a build again. The full fsl-setup-release.sh is not needed.
#cd fsl-release-bsp
#mkdir build-new
#source setup-environment build-new/
Image Deployment
After a build is complete, the created image resides in <build directory>/tmp/deploy/images/imx6dlsabresd. An image is, for the
most part, specific to the machine set in the environment setup. Each image build creates a U-Boot, a kernel, and an image
type based on the IMAGE_FSTYPES defined in the machine configuration file. You will only need fsl-image-gui-imx6dlsabresd-“datecode”.rootfs.tar.bz2. Please rename it to yocto-imx6dl-gui-3.14.28.tar.bz2 and copy the file to path \mfgtool\Image\Filesystem of Mfgtool blow.
1. Download Mfgtool : Here is Mfgtool to flash image into eMMC.
2. Set SW1 of RSC-IMX61 in download mode.
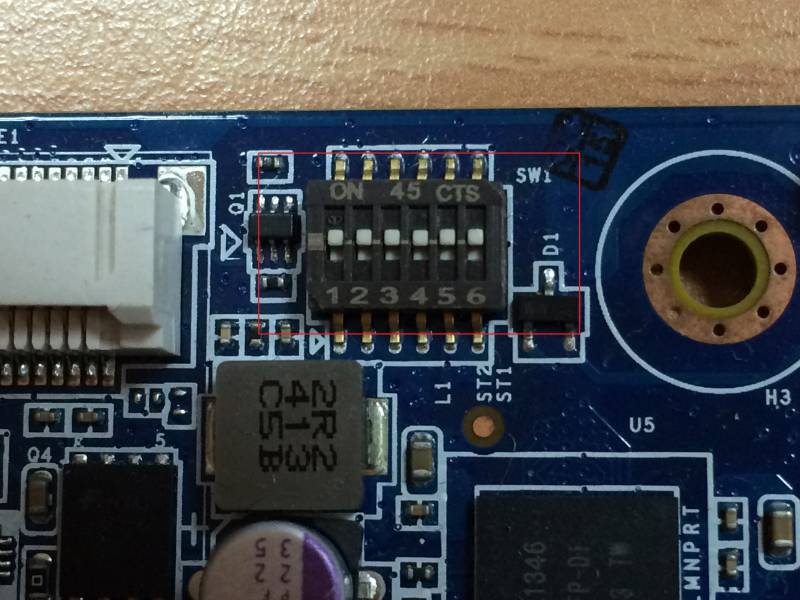
Then you will have to connect USB OTG cable from RSC-IMX61 connector JUSB1(Mini USB) to USB port of a Windows system. Then power on RSC-IMX61.
3. Please run MFG-Helper.exe in \mfgtool-rsc_imx61_yocto\Mfg-RSC-IMX6 and setit as below.
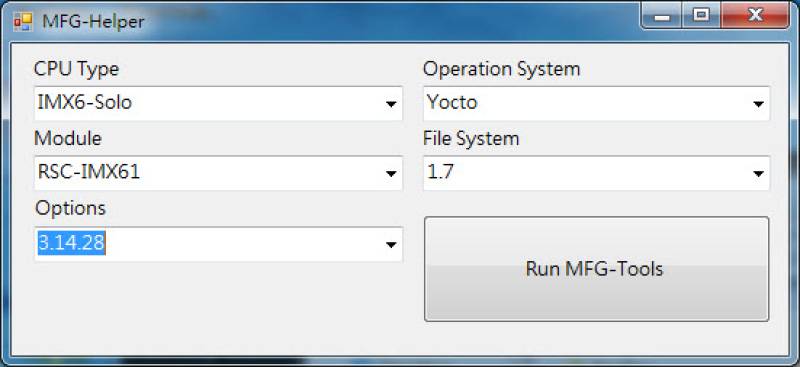
Then Click “Start” to flash image

Flashing an SD card image
This section describes how to set up the partitions manually. This needs to be done to individually load the bootloader, kernel, and rootfs. There are various ways to partition an SD card. Essentially, the boot loader image needs to be at the beginning of the card. Followed by the Linux image and the device tree file. These can either be in a partition or not. The root file system does need to be in a partition that starts after the Linux section. Make sure that each section has enough space. The example below creates two partitions.
On most Linux host operating systems, the SD card is mounted automatically upon insertion. Therefore, before running fdisk, make sure that the SD card is unmounted if it was previously mounted (through sudo umount /dev/sdx).
1. Start by running fdisk with root permissions. Use the instructions above to determine the card ID. We are using sdx here as an example.
#sudo fdisk /dev/sdx
2. Type the following parameters (each followed by <ENTER>):
p [lists the current partitions]
d [to delete existing partitions. Repeat this until no unnecessary partitions are reported by the 'p' command to start fresh.]
u [switch the unit to sectors instead of cylinders]
n [create a new partition]
p [create a primary partition - use for both partitions]
1 [the first partition]
20480 [starting at offset sector]
1024000 [size for the first partition to be used for the boot images]
p [to check the partitions]
n [create a new partition]
p [primary partition]
2 [the second partition]
1228800 [starting at offset sector, which leaves enough space for the kernel, the boot loader and its configuration data]
<enter> [using the default value will create a partition that extends to the last sector of the media]
p [to check the partitions]
w [this writes the partition table to the media and fdisk exits]
3. Use command below to install u-boot into SD card :
#sudo dd if=u-boot-6dl.imx of=/dev/sdx bs=512 seek=2 conv=fsync
The first 1 KB of the SD/MMC card, which includes the partition table, will be preserved.
4. Copying the kernel image and DTB file
1)Format partition 1 on the card as VFAT with this command:
#sudo mkfs.vfat /dev/sdx1
2)Mount the formatted partition with this command:
#mkdir mountpoint
#sudo mount /dev/sdx1 mountpoint
3)Copy the zImage and *.dtb files to the mountpoint by using cp. The device tree names should match the mount point specified by U-Boot. Be sure to un-mount the partition with this command:
#sudo umount mountpoint
5. Copying the root file system (rootfs)
Copy the target file system to a partition that will only contain the rootfs. This example uses partition 2 for the rootfs. First format the partition. The file system format ext3 or ext4 is a good option for the removable media due to the built-in journaling. Replace sdx with the partition in use in your configuration.
#sudo mkfs.ext3 /dev/sdx2
Or
#sudo mkfs.ext4 /dev/sdx2
Copy the target file system to the partition:
#mkdir /home/user/mountpoint
#sudo mount /dev/sdx2 /home/user/mountpoint
Extract rootfs package to SD card: extract yocto-imx6dl-gui-3.14.28.tar.bz2 (You can find this file in folder \mfgtool-rsc_imx61_yocto\Image\Filesystem in Mfgtool) to /home/user/mountpoint
#sudo tar jxvf yocto-imx6dl-gui-3.14.28.tar.bz2 -C /home/user/mountpoint
#sudo umount /home/user/mountpoint
Setup serial connection between RSC-IMX61 & Linux development platform.
Connect serial console of RSC-IMX61 to your Linux development platform. For example, we use “putty”. Here is my setting of serial port.
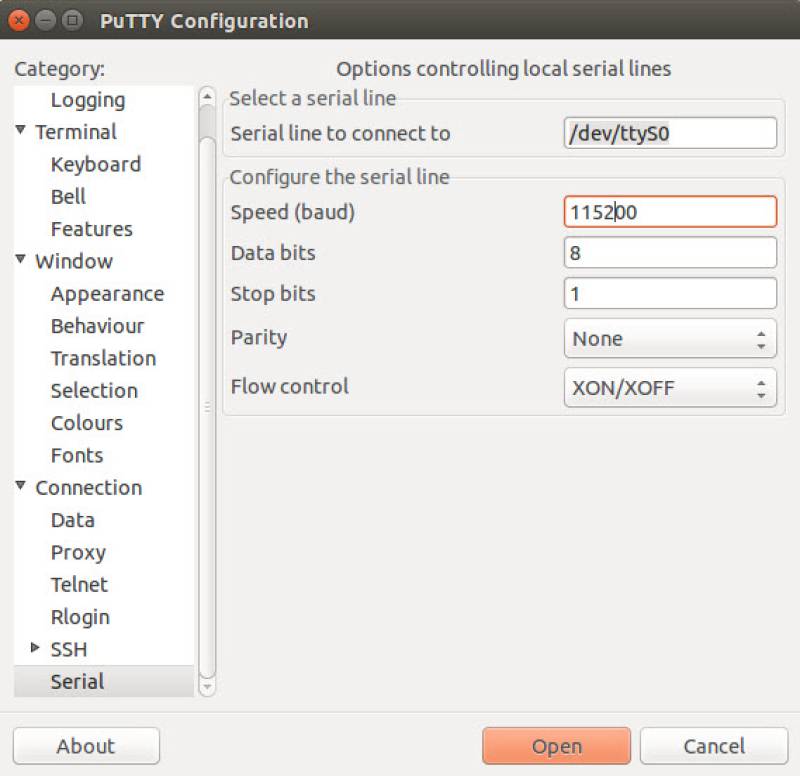
If you do not have putty with your system, use command below to install it.
#sudo apt-get install putty
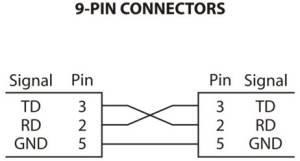
Default serial console of RSC-IMX61 is JCOM1. Please use the way below to connect signals between Linux development platform and RSC-IMX61.
Plug the Micro SD card on RSC-IMX61D and set SW1 as below :
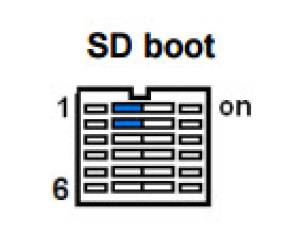
Then you will be able to boot from SD w/o problem.
You can also refer to original Yocto documentation from NXP here.

