

meta data for this page
Build and install Yocto for IMX6-POS
Here you can find instruction to setup development environment for Yocto source code for IMX6-POS and the way to install Yocto on system. With this guideline, user will be able to setup the system easily and test all the functions with the system.
Availability
IMX6-POS Quad core or IMX6-POS Dual lite
Generating RSA Keys
Use command below to generate RSA Key :
#ssh-keygen -t rsa
You can find “id_rsa.pub” in path below. Please send it to us by email to get access right of Avalue GIT server.
#/home/username/.ssh/
Download Source code and cross compiler tool from Avalue git server
#git clone gitlab@aes.avalue.com.tw:ACP-IMX6POS/ACP-IMX6POS-Kernel.git -b 3.14.28-1.0.0
Setup Build Environment
The recommended minimum Ubuntu version is 14.04 but builds for dizzy will work on 12.04 or later. Earlier versions may cause the Yocto Project build setup to fail, because it requires python versions only available starting wtih Ubuntu 12.04.
Essential Yocto Project host packages:
#sudo apt-get install gawk wget git-core diffstat unzip texinfo gcc-multilib build-essential chrpath socat
i.MX layers host packages for a Ubuntu 12.04 or 14.04 host setup:
#sudo apt-get install libsdl1.2-dev xterm sed cvs subversion coreutils texi2html docbook-utils python-pysqlite2 \
help2man make gcc g++ desktop-file-utils libgl1-mesa-dev libglu1-mesa-dev mercurial autoconf automake groff \
curl lzop asciidoc
i.MX layers host packages for a Ubuntu 12.04 host setup only:
#sudo apt-get install uboot-mkimage
i.MX layers host packages for a Ubuntu 14.04 host setup only:
#sudo apt-get install u-boot-tools
Compile U-Boot & Kernel Source code
After you download source code from Avalue GIT server, you will find a folder named “core”. Here is description for each folder & files inside.
| Item | Description |
|---|---|
| kernel | folder with kernel source code inside |
| Makefile | Makefile for compile u-boot & kernel image |
| u-boot | folder with u-boot souce code inside |
Use command below to compile u-boot & kernel
#make -j4
Use command below to compile u-boot only
#make uboot -j4
Use command below to compile kernel only
#make kernel -j4
Use command below to clean all the binary files in source code
#make clean
After you finish to compile source code, you will find files below. Here are description for each files
| Item | Description |
|---|---|
| u-boot-q.imx | u-boot for IMX6-POS Quad core with 1GB DDR3L memory |
| u-boot-dl.imx | u-boot for IMX6-POS Dual lite with 1GB DDR3L memory |
| imx6dl-pos.dtb | setting file for IMX6-POS Dual lite |
| imx6q-pos.dtb | setting file for IMX6-POS Quad core |
| zImage | kernel file for IMX6-POS |
You will have to copy image files to path ~\Image\POS\Yocto\ of your MfgTool folder.
Bootloader : U-Boot
To modify default setting for u-boot command, you can modify following files in path core/u-boot/include/configs/
| Item | Description |
|---|---|
| mx6pos_common.h | Default settings for IMX6-POS |
Linux Kernel
Please get into folder core/kernel and use command below to load default configuration of kernel and config it
| Command | Description |
|---|---|
| #./run.sh -j4 | Command to build kernel for IMX6-POS |
| #./run.sh menuconfig | Command to setup kernel configuration |
| #./run.sh modules | Command to build kernel modules |
| #./run.sh clean | Command to clean binary files in kernel source code |
You can find update uImage in path core/kernel/arch/arm/boot/dts
Setting up the repo utility
Repo is a tool built on top of Git that makes it easier to manage projects that contain multiple repositories, which do not need
to be on the same server. Repo complements very well the layered nature of the Yocto Project, making it easier for customers
to add their own layers to the BSP.
To install the “repo” utility, perform these steps:
1. Create a bin folder in the home directory.
#mkdir ~/bin (this step may not be needed if the bin folder already exists)
#curl http://commondatastorage.googleapis.com/git-repo-downloads/repo > ~/bin/repo
#chmod a+x ~/bin/repo
2. Add the following line to the .bashrc file to ensure that the ~/bin folder is in your PATH variable.
export PATH=~/bin:$PATH
Yocto Project Setup
The following steps shows how to download the Freescale Yocto Project Community BSP recipe layers. For this example, a directory called fsl-release-bsp is created for the project.
#mkdir fsl-release-bsp
#cd fsl-release-bsp
#git config --global user.name "Your Name"
#git config --global user.email "Your Email"
#git config --list
#repo init -u git://git.freescale.com/imx/fsl-arm-yocto-bsp.git -b imx-3.14.28-1.0.0_ga
#repo sync
Image Build
This section provides the detailed information along with the process for building an image. Here is instruction to teach you build your own Yocto image.
#cd fsl-release-bsp
#mkdir build //This is your build directory
#source setup-environment build //This is to check all the MACHINE supported
#MACHINE=imx6qsabresd source fsl-setup-release.sh -b build -e x11 //could be fb, dfb, wayland, x11
#bitbake fsl-image-gui //could be fsl-image-qt5 if you want to build image with qt5 support.
For more detail information. Please check Freescale Yocto Prohect User's Guide.
Restarting a build environment or performing a new build
If a new terminal window is opened or the machine is rebooted after a build directory is set up, the setup environment script
should be used to set up the environment variables and run a build again. The full fsl-setup-release.sh is not needed.
#cd fsl-release-bsp
#mkdir build-new
#source setup-environment build-new/
Image Deployment
After a build is complete, the created image resides in <build directory>/tmp/deploy/images. An image is, for the
most part, specific to the machine set in the environment setup. Each image build creates a U-Boot, a kernel, and an image
type based on the IMAGE_FSTYPES defined in the machine configuration file. Most machine configurations provide an SD
card image (.sdcard), an ext3 and tar.bz2. The ext3 is the root file system only. The .sdcard image contains U-Boot, the kernel
and the rootfs completely set up for use on an SD card.
1. Flashing an SD card image
An SD card image provides the full system to boot with U-Boot and kernel. To flash an SD card image, run the following command:
For example, if your SD card device node is /dev/sdd and image name is sma-imx6qi.sdcard.
#sudo dd if=sma-imx6qi.sdcard of=/dev/sdd bs=1M && sync
2. Flash Yocto image to onboard eMMC
Please kindly download MfgTool for Yocto from hyperlink below. PS:so far it is just available for Dual lite image file
MfgTool for Yocto
1. Set JBTSL1 on ACP-IMX6POS as below to serial download mode

2. Use mini-USB cable to connect JMUSB1 on ACP-IMX6POS to Windows 7 system.
3. Run MfgTool2.exe and set as the diagram below to flash image file.


4. It will show “Done” after flashing is finish, then click “Stop” and “Exit” to close the screen.

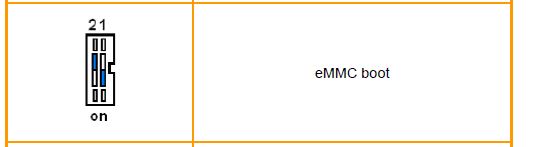
5. Set SW1 as below to boot from eMMC
6. Restart the system then boot in Android
How to build the booting SD card for Yocto
For the procedures below, we place all the needed files on the path “/home/leo/Desktop/”, and the /dev/sdd is SD card, so those are just for your reference.
Requested File Download Link below
All requested files
Step.
1. sudo dd if=/home/leo/Desktop/zero.img of=/dev/sdd bs=1M conv=fsync
2. sudo sh /home/leo/Desktop/mksdcard-yocto.sh /dev/sdd
3. sudo dd if=/home/leo/Desktop/u-boot-dl.imx of=/dev/sdd bs=1k seek=1 conv=fsync
4. sudo mkfs.vfat /dev/sdd1
5. sudo mkfs.ext4 -j /dev/sdd2
6. sudo mkdir -p /mnt/sdd1
7. sudo mkdir -p /mnt/sdd2
8. sudo mount -t vfat /dev/sdd1 /mnt/sdd1
9. sudo mount -t ext4 /dev/sdd2 /mnt/sdd2
10. sudo mv /home/leo/Desktop/zImage zImage
11. sudo cp zImage /mnt/sdd1
12. sudo mv /home/leo/Desktop/imx6dl-pos.dtb imx6dl-pos.dtb
13. sudo cp imx6dl-pos.dtb /mnt/sdd1
14. sudo umount /dev/sdd2
15. sudo mount /dev/sdd2 /mnt
16. cd /mnt
17. sudo tar -jxvpf fsl-image-gui-dl-yocto-1.7.tar.bz2
18. You can insert the SD card for booting and set the jumper as below before powering on.
