

meta data for this page
Build and install Android image for x86 or ARM version
Here you can find instruction to setup development environment for x86 or ARM version source code for REV-Q703 and the way to install it on eMMC. With this guideline, user will be able to setup the system easily and test all the functions with the system.
Setup Build Environment
Please following the command below to install Oracle JDK6.0 and other packages on Ubuntu 12.04 or 14.04
#sudo apt-get install python-software-properties
#sudo add-apt-repository ppa:webupd8team/java
#sudo apt-get update
#sudo apt-get install oracle-java6-installer
#sudo update-alternatives --config java
#sudo apt-get install mtools
#sudo apt-get install squashfs-tools
#sudo apt-get install mksquashfs
Please refer to hyperlink below to setup development environment
Initializing a Build Environment
Generating RSA Keys before download the source code
Use command below to generate RSA Key :
#ssh-keygen -t rsa
You can find “id_rsa.pub” in path below. Please send it to us by email to get access right of Avalue GIT server.
#/home/username/.ssh/
If you had done this before for your Ubuntu development platform, there's no necessary to do it again.
1. For ARM version module
Download Source code and cross compiler tool from Avalue git server
#git clone gitlab@aes.avalue.com.tw:REV-Q703/REV-Q703_Android.git -b 4.4.2
Compile Android Source code
Please following instruction below to compile Android source code
#cd Android
#./run.sh -j4
You can find all image files in path Android/out/target/product/smarc/
| Image File | Description |
|---|---|
| boot.img | kernel image file |
| recovery.img | recovery image file |
| system.img | system image file |
| u-boot-6q.bin | bootloader for IMX6-POS Quad core |
| u-boot-6dl.bin | bootloader for IMX6-POS Dual lite |
Please copy all of them to path Android-MfgTools\Image\smarc\android of MfgTool folder.
Install Android image into eMMC
Download MfgTool for Android from Hyperlink below
MfgTool for Android
1. Set JBTSL1 on RQM-IMX6 as below to serial download mode

2. Use mini-USB cable to connect JMUSB1 on RQM-IMX6 to Windows 7 system.
3. Run MfgTool2.exe and click start to flash image file.
| MfgTool | Description |
|---|---|
| Android-MfgTools\MX6DL-Android\MfgTool2.exe | MfgTool for i.MX6 Solo or Dual Lite |
| Android-MfgTools\MX6Q-Android\MfgTool2.exe | MfgTool for i.MX6 Dual & Quad |

4. It will show “Done” after flashing is finish, then click “Stop” and “Exit” to close the screen.

5. Set SW1 as below to boot from eMMC
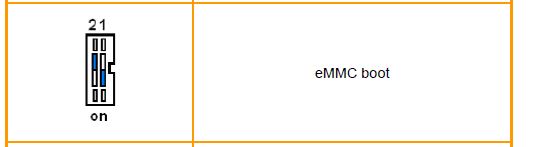
6. Restart the system then boot in Android
2. For x86 version module
Download Source code and cross compiler tool from Avalue git server
#git clone giter@aes.avalue.com.tw:x86 -b 4.4.4-REVQ703
Compile Android Source code
Please following instruction below to compile Android source code
#cd Android
#./run.sh -j4
You can find all image files in path Android/out/target/product/smarc/
| Image File | Description |
|---|---|
| live.img | Android image file |
Please copy that to path Android-MfgTools\Image\smarc\android of MfgTool folder.
How to install the image file to emmc of EQM-BYT2
1. Download the image file first
Download Link
2. Please prepare an USB pendrive for booting, then use the command “dd” below to flash the image file into USB pendrive on ubuntu.

3. Insert the pendrive for booting, and choose the pendrive as booting device on the BIOS then rebooting.

4. Choose “Run interactive installer” for installation.

5. Connect a cross-over RS232 cable between JCOM1 of EQM-BYT2 to PC(virtual comport), if you do not have RS232 cross over cable, please make one by yourself as below.

6. Press “Y” for next step.

7. Press “Y” for next step.

8.Set the timeout for boot menu. e.g. mine is 5.

9. Press “Enter” for next step.

10. Wait for a while for falshing image file into partition of memory.

11. Press “Enter” for next step.

12. Choose “Android” and booting, the Android window will show up as below.
