meta data for this page
Build and install Ubuntu System for SMA-IMX6
Here you can find instruction to setup development environment for U-boot & Kernel source code for SMA-IMX6 and the way to install Ubuntu system. With this guideline, user will be able to setup the system easily and test all the functions with the system.
Availability
SMA-IMX6QI or SMA-IMX6SI
Carrier Board
REV-SA01 (3.5“ evaluation baseboard for SMARC module)
Setup Build Environment
To build U-Boot & kernel source code for SMA-IMX6, you will need to install following packages on Ubuntu. 64bit users have to make sure 32bit libraries has been installed for their system.
| Distribution | packages (sudo apt-get update ; sudo apt-get install xxx) |
|---|---|
| Ubuntu 12.04 | ia32-libs u-boot-mkimage |
| Ubuntu 14.04 | libc6:i386 libstdc++6:i386 libncurses5:i386 zlib1g:i386 u-boot-tools |
Generating RSA Keys
Use command below to generate RSA Key :
#ssh-keygen -t rsa
You can find “id_rsa.pub” in path below. Please send it to us by email to get access right of Avalue GIT server.
#/home/username/.ssh/
Download Source code and cross compiler tool from Avalue git server
#git clone gitlab@aes.avalue.com.tw:REV-SA01/REV-SA01_Kernel.git -b 3.0.35-4.0.0
Compile U-Boot & Kernel Source code
After you download source code from Avalue GIT server, you will find a folder named “core”. Here is description for each folder & files inside.
| Item | Description |
|---|---|
| fsl | folder with cross compile tools inside |
| kernel | folder with kernel source code inside |
| Makefile | Makefile for compile u-boot & kernel image |
| u-boot | folder with u-boot souce code inside |
Use command below to compile u-boot & kernel
#make -j4
Use command below to compile u-boot only
#make rev-sa01-uboot -j4
Use command below to compile kernel only
#make rev-sa01-kernel -j4
Use command below to clean all the binary files in source code
#make clean
After you finish to compile source code, you will find files below. Here are description for each files
| Item | Description |
|---|---|
| u-boot-quad-2g.bin | u-boot for SMA-IMX6QI with 2GB DDR3L memory |
| u-boot-quad.bin | u-boot for SMA-IMX6QI with 1GB DDR3L memory |
| u-boot-solo.bin | u-boot for SMA-IMX6SI with 1GB DDR3L memory |
| uImage-p | kenrnel image file for SMA-IMX6 with PF0100 PMIC |
| uImage | kernel image file for SMA-IMX6 with WM8326 PMIC |
You will have to copy image files to path MFG-REV-SA01\Image\smarc\ of your MfgTool folder.
Bootloader : U-Boot
To modify default setting for u-boot command, you can modify following files in path core/u-boot/include/configs/
| Item | Description |
|---|---|
| mx6_smarc.h | Default settings for SMA-IMX6 SMARC module |
| mx6q_rev_sa01.h | Default settings for SMA-IMX6QI + REV-SA01 |
| mx6solo_rev_sa01.h | Default settings for SMA-IMX6SI + REV-SA01 |
Linux Kernel
Please get into folder core/kernel and use command below to load default configuration of kernel and config it
| Command | Description |
|---|---|
| #./run.sh rev-sa01 -j4 | Command to build kernel for SMA-IMX6(WM8326PMIC) + REV-SA01 |
| #./run.sh rev-sa01-p -j4 | Command to build kernel for SMA-IMX6(PF0100) + REV-SA01 |
| #./run.sh menuconfig | Command to setup kernel configuration |
| #./run.sh modules | Command to build kernel modules |
| #./run.sh clean | Command to clean binary files in kernel source code |
You can find update uImage in path core/kernel/arch/arm/boot
Ubuntu Root File System
Please kindly download mfgtool from hyperlink below.
MfgTool for Ubuntu
Please download and decompress it. You can find ubuntu.tar.bz2 in path MFG-REV-SA01\Image\smarc
The Ubuntu file system we provided in mfgtool is Ubuntu 12.04. Here is user name & password information.
| user name | password |
|---|---|
| linaro | linaro |
Install System into SD Card
Please insert a SD card in the card reader on your Ubuntu development system.
1. Check device node of the SD card by command below
#cat /proc/partitions
For example, mine is /dev/sdd as below

2. Create partition for SD card
#sudo fdisk /dev/sdd
Type the following parameters (each followed by <ENTER>):
d         [delete the previous partition]
n         [create a new partition]
p         [create a primary partition]
1         [the first partition]
20480     [20480x512bytes=10MB, which leaves enough space for the kernel, the boot loader and its configuration data]
<enter>    [using the default value will create a partition that spans to the last sector of the medium]
w        [ this writes the partition table to the medium and fdisk exits]
3. Format new partition in EXT3 format
#sudo umount /dev/sdd1
#sudo mkfs.ext3 /dev/sdd1
4. install u-boot on SD card by command below
//This is command to install u-boot for SMA-IMX6SI on SD card
#sudo dd if=u-boot-solo.bin of=/dev/sdd  bs=1k seek=1 skip=1 conv=fsync
//This is command to install u-boot for SMA-IMX6QI on SD card
#sudo dd if=u-boot-quad.bin of=/dev/sdd  bs=1k seek=1 skip=1 conv=fsync
//This is command to install u-boot for SMA-IMX6QI with 2GB DDR3L on SD card
#sudo dd if=u-boot-quad-2g.bin of=/dev/sdd  bs=1k seek=1 skip=1 conv=fsync
5. Install kernel image file on SD card by command below
//This is command to install kernel for SMA-IMX6 with PMIC WM8326 on SD card
#sudo dd if=uImage of=/dev/sdd  bs=1M seek=1 conv=fsync
//This is command to install kernel for SMA-IMX6 with PMIC PF0100 on SD card
#sudo dd if=uImage-p of=/dev/sdd  bs=1M seek=1 conv=fsync
6. Get ubuntu.tar.bz2 from mfgtool and use command below to copy it on SD card
#sudo umount /dev/sdd1
#sudo mount /dev/sdd1 /mnt
#cd /mnt
#sudo tar jxpf ~/ubuntu.tar.bz2
#cd ..
#cd umount /dev/sdd1
With these steps, you had successfully install Ubuntu on SD card. Now you can insert it on SD socket on REV-SA01 and set SW1 as below before you power it on.

Modify u-boot setting to load kernel image & Ubuntu file system from SD card
1. Connect a cross-over RS232 cable between COM1 of REV-SA01 and Windows 7 system.
2. If you do not have RS232 cross over cable, please make one by yourself as below.

3. Use hyper terminal program, like PUTTY to link with i.MX6 system.
4. Power on REV-SA01 and press SPACE on keyboard to get into -boot menu.

5. Set boot device as command below in u-boot menu
SMARC U-Boot >setenv linux_cmd  ‘setenv bootargs ${linux_bootargs};mmc dev 1;mmc read ${loadaddr} 0x800 0x3000;bootm’
SMARC U-Boot > setenv linux_bootargs 'console=tty0 console=ttymxc0,115200 root=/dev/mmcblk1p1 rootwait rw'
SMARC U-Boot> saveenv
SMARC U-Boot> boot
Now you can boot from SD card w/o problem.
Install System into eMMC
1. Set SW1 on REV-SA01 as below to serial download mode

2. Use mini-USB cable to connect MINIUSB1 on REV-SA01 to Windows 7 system.
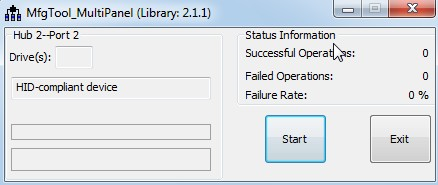
3. Run MfgTool2.exe in path MFG-REV-SA01\MFG-Tools\ and click start to flash image file.

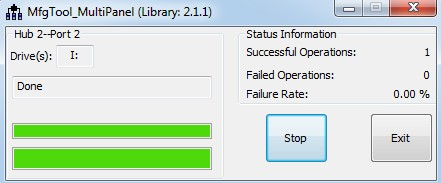
4. It will show “Done” after flashing is finish, then click “Stop” and “Exit” to close the screen.

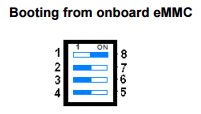
5. Set SW1 as below to boot from eMMC

6. Restart the system then boot in Ubuntu
Setting for different display (LDB, LCD, HDMI, LCD+HDMI, LDB+HDMI, LDB+LCD)
For Linux, please move the directory to “~/ kernel/arch/arm/mach-mx6/smarc/rev_sa01.c”, you can refer the contents below to revise it for suitable display.
1.HDMI
       {
        .disp_dev = "hdmi",
        .interface_pix_fmt = IPU_PIX_FMT_RGB24,
        .mode_str = "1920x1080M@60",
        .default_bpp = 32,
        .int_clk = false,
        .late_init = false,
        },
        mx6q_init_audio();
        smarc_fb_init();
//      set_smarc_lvds();
//      imx6q_add_lcdif(&lcdif_data);
//      imx6q_add_ldb(&ldb_data);
        set_smarc_hdmi();
        imx6q_add_vpu();
        imx_add_viv_gpu(&imx6_gpu_data, &imx6q_gpu_pdata);
        imx6q_add_v4l2_output(0);

        set_smarc_gpio();
        mx6q_smarc_init_uart();
        set_smarc_sdio();
        smarc_can_init();
    static struct fsl_mxc_hdmi_core_platform_data hdmi_core_data = {
    .ipu_id = 0,
    .disp_id = 0,
    };
2. LCD
       {
        .disp_dev = "lcd",
        .interface_pix_fmt = IPU_PIX_FMT_BGR24,
        .mode_str = "LCD_XGA",
        .default_bpp = 16,
        .int_clk = false,
        },
void __init smarc_board_init(void)
{
        mx6q_init_audio();
        smarc_fb_init();
//      set_smarc_lvds();
        imx6q_add_lcdif(&lcdif_data);
//      imx6q_add_ldb(&ldb_data);
//      set_smarc_hdmi();
        imx6q_add_vpu();
        imx_add_viv_gpu(&imx6_gpu_data, &imx6q_gpu_pdata);
        imx6q_add_v4l2_output(0);

        set_smarc_gpio();
        mx6q_smarc_init_uart();
        set_smarc_sdio();
        smarc_can_init();
static struct fsl_mxc_lcd_platform_data lcdif_data = {
        .ipu_id = 0,
        .disp_id = 0,
        .default_ifmt = IPU_PIX_FMT_BGR24,
};
3.LDB(LVDS)
       {
        .disp_dev = "ldb",
        .interface_pix_fmt = IPU_PIX_FMT_RGB666,
        .mode_str = "SVGA",
        .default_bpp = 32,
        .int_clk = false,
        .late_init = false,
        },
void __init smarc_board_init(void)
{
        mx6q_init_audio();
        smarc_fb_init();
        set_smarc_lvds();
//      imx6q_add_lcdif(&lcdif_data);
        imx6q_add_ldb(&ldb_data);
//      set_smarc_hdmi();
        imx6q_add_vpu();
        imx_add_viv_gpu(&imx6_gpu_data, &imx6q_gpu_pdata);
        imx6q_add_v4l2_output(0);

        set_smarc_gpio();
        mx6q_smarc_init_uart();
        set_smarc_sdio();
        smarc_can_init();
static struct fsl_mxc_ldb_platform_data ldb_data = {
        .ipu_id                 = 0,
        .disp_id                = 0,
        .ext_ref                = 1,
        .mode                   = LDB_SEP0,
        .sec_ipu_id             = 0,
        .sec_disp_id    = 1,
};
4.LCD+HDMI
static struct ipuv3_fb_platform_data smarc_fb_data[] = {


        {
        .disp_dev = "lcd",
        .interface_pix_fmt = IPU_PIX_FMT_RGB24,
        .mode_str = "LCD_WVGA",
        .default_bpp = 32,
        .int_clk = true,
        },

        {
        .disp_dev = "hdmi",
        .interface_pix_fmt = IPU_PIX_FMT_RGB24,
        .mode_str = "1920x1080M@60",
        .default_bpp = 32,
        .int_clk = false,
        .late_init = false,
        },
void __init smarc_board_init(void)
{
        mx6q_init_audio();
        smarc_fb_init();
//      set_smarc_lvds();
        imx6q_add_lcdif(&lcdif_data);
//      imx6q_add_ldb(&ldb_data);
        set_smarc_hdmi();
        imx6q_add_vpu();
        imx_add_viv_gpu(&imx6_gpu_data, &imx6q_gpu_pdata);
        imx6q_add_v4l2_output(0);

        set_smarc_gpio();
        mx6q_smarc_init_uart();
        set_smarc_sdio();
        smarc_can_init();
static struct fsl_mxc_lcd_platform_data lcdif_data = {
        .ipu_id = 0,
        .disp_id = 0,
        .default_ifmt = IPU_PIX_FMT_BGR24,
};

static struct fsl_mxc_hdmi_core_platform_data hdmi_core_data = {
    .ipu_id = 1,
    .disp_id = 0,
};
5. LDB+HDMI
static struct ipuv3_fb_platform_data smarc_fb_data[] = {

        {
        .disp_dev = "ldb",
        .interface_pix_fmt = IPU_PIX_FMT_RGB666,
        .mode_str = "SVGA",
        .default_bpp = 32,
        .int_clk = false,
        .late_init = false,
        },

         {
        .disp_dev = "hdmi",
        .interface_pix_fmt = IPU_PIX_FMT_RGB24,
        .mode_str = "1920x1080M@60",
        .default_bpp = 32,
        .int_clk = false,
        .late_init = false,
        },
void __init smarc_board_init(void)
{
        mx6q_init_audio();
        smarc_fb_init();
        set_smarc_lvds();
//      imx6q_add_lcdif(&lcdif_data);
        imx6q_add_ldb(&ldb_data);
        set_smarc_hdmi();
        imx6q_add_vpu();
        imx_add_viv_gpu(&imx6_gpu_data, &imx6q_gpu_pdata);
        imx6q_add_v4l2_output(0);

        set_smarc_gpio();
        mx6q_smarc_init_uart();
        set_smarc_sdio();
        smarc_can_init();
static struct fsl_mxc_ldb_platform_data ldb_data = {
        .ipu_id                 = 0,
        .disp_id                = 0,
        .ext_ref                = 1,
        .mode                   = LDB_SEP0,
        .sec_ipu_id             = 0,
        .sec_disp_id    = 1,
};

static struct fsl_mxc_hdmi_core_platform_data hdmi_core_data = {
    .ipu_id = 1,
    .disp_id = 0,
};
6.LDB+LCD
static struct ipuv3_fb_platform_data smarc_fb_data[] = {

        {
        .disp_dev = "ldb",
        .interface_pix_fmt = IPU_PIX_FMT_RGB666,
        .mode_str = "SVGA",
        .default_bpp = 32,
        .int_clk = false,
        .late_init = false,
        },


        {
        .disp_dev = "lcd",
        .interface_pix_fmt = IPU_PIX_FMT_BGR24,
        .mode_str = "LCD_XGA",
        .default_bpp = 16,
        .int_clk = false,
        },

};
void __init smarc_board_init(void)
{
        mx6q_init_audio();
        smarc_fb_init();
        set_smarc_lvds();
        imx6q_add_lcdif(&lcdif_data);
        imx6q_add_ldb(&ldb_data);
//      set_smarc_hdmi();
        imx6q_add_vpu();
        imx_add_viv_gpu(&imx6_gpu_data, &imx6q_gpu_pdata);
        imx6q_add_v4l2_output(0);

        set_smarc_gpio();
        mx6q_smarc_init_uart();
        set_smarc_sdio();
        smarc_can_init();
static struct fsl_mxc_ldb_platform_data ldb_data = {
        .ipu_id                 = 0,
        .disp_id                = 0,
        .ext_ref                = 1,
        .mode                   = LDB_SEP0,
        .sec_ipu_id             = 0,
        .sec_disp_id    = 1,
};

static struct fsl_mxc_lcd_platform_data lcdif_data = {
        .ipu_id = 1,
        .disp_id = 0,
        .default_ifmt = IPU_PIX_FMT_BGR24,
};

